There is a blog hop that is doing the rounds of creative blogs right now. the idea is that you answer the questions and then tag up to 3 blogs you follow and admire. They then do the same -ta dah!- and it goes on and on. I was tagged by Keeley of
Stitch & Color who blogs about a range of creative topics including her cool embroideries.
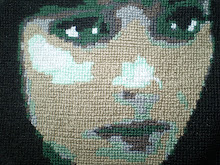
crewel skull
1. What am I working on?
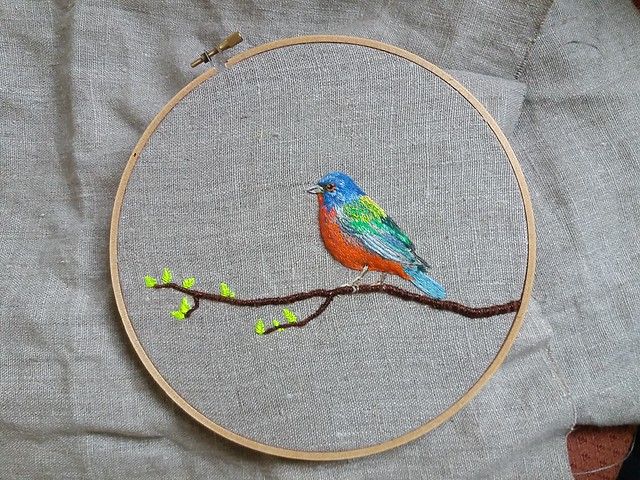
I like to chop and change so tend to keep a few projects on the go; I am still working on my boxing hares piece, it's giving me problems- I forsee a lot of unpicking in my future as the legs have gone all wonky. I had a mammoth stitching session and forgot to 'stand back' from it, it wasn't until I saw it from a distance that I realised it has gone a bit weird.
I also have a crewelwork day of the dead skull which I turn to when I want something easy to work on and I also have just sketched up a little anthropomorphic tap dancing mouse that I plan to stitch up for a friend. The crewel work is an iron on from
this book. I don't often stitch from patterns but find it very therapeutic when I do. It is so relaxing to focus on each stitch rather than having to make all those decisions about shading, weight of line etc.
boxing hares WIP- the legs have gone all wrong and need some unpicking
2. How does my work differ from others of its genre?
I stitch for me so don't need to worry about uniqueness - as long as I like what I do it doesn't matter if it is derivative or predictable. Having said that i am fairly resistant to 'trends' i am only now coming round to the geometric and pastel trends that have been all over craft blogs forever!
Embroidery is still a pretty niche craft so I think that just by working in stitch I am making something different from the norm and I love to see all the innovative ways the online stitchy community use their embroidery to create art. I like to use techniques like goldwork and stumpwork which are less 'common' forms of embroidery. This isn't me trying to stand out, I am just a total embroidery geek. Having said that my stumpwork pieces tend to be the ones that get the most attention - I think people see stumpwork as being a bit 'magical'. Let me share a secret about stumpwork with you... yes it is fiddly... yes it might take a bit longer... but difficult?...nah, not so much. It is so much easier than it looks- I would love to see more people using stumpwork.
detail of crewel skull
3. Why do I create what I do?
I trained in Fine Art so making stuff is important to me, I then went on to do a second degree in Occupational Therapy which is what I now do for a living. As an OT I believe that the things we do are what give our lives meaning. Engaging in embroidery fulfills so many purposes for me: through embroidery I connect with others, feel achievement as I learn new things and master skills, it relaxes me and I can be totally absorbed in what I am doing. I can focus on the moment and forget everything else- so important in my busy life. Having some form of creative outlet makes me happy and being an introvert I need to express my personality somehow- stitching fits the bill for me. So I really do see my embroidery as a meaningful occupation, I have had a few breaks from stitching over the years where I have lost my stitchy mojo (it happens to us all I think) but I always miss it eventually and come back to it. Recently I have recognised how much I value it and if I lose that urge to create embroidery I join a swap/ stitchalong and that always gets me inspired to stitch again.
Embroidery is good for you- In fact I could write a whole post just about this!
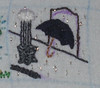
pudding
How does your creating process work?
Sometimes I just have a random idea that develops into a piece. I like to sketch stuff out first. I will use photos for source material- often I use google image searches to find photos to use.
Then I will often transfer a basic outline to fabric and get stuck in, I sort out the details as I go along. I rarely pick out a colour palette before I start or plan what stitches to use. Making it up as I go along feels natural to me and encourages me to try new things which is good for creativity.
The little beetle embroidery above is something I made last week- it is called 'pudding' because my son had a 'pet' beetle he found and christened Pudding. So we could distinguish Pudding from other beetles we marked him with gold glittery nail polish- he looked FABULOUS. Sadly the nail polish might have been what led to poor Pudding's demise- we found him dead that night and had to get rid of the ex-Pudding whilst my son was asleep and make up a story about him going to live in the garden. I wanted to remember Pudding in all his glittery glory, so have added some goldwork bright check purl to my stitching to make him sparkle.
Ok... after the fabulousness that is Pudding are you ready for some ultra-fab blogs?
First up is Lisa of
A Cuppa Tea with Me she is a kindred spirit, a tea-fuelled stitcher so we were destined to find each other over the internet! Lisa is a really talented embroiderer and is doing some gorgeous things with felt.
Next we have Crystal whose blog is
Fiberartsy, I can't quite remember how I found Crystal- maybe through blogging or maybe via Craftster but I have been following her blog for years. Her stitching is immaculate and I love the conversational way she writes about her embroidery.
Finally can I introduce you to
Flaming Nora (which should win some sort of best name for a blog award). She makes beautiful arty embroidery and has a job making costumes which she shares titbits about and which I am incredibly jealous of.
Please give them all a visit (and don't forget Keeley up there at the top of the post) they were all kind enough to be tagged in this chain letter style game and I am looking forward to hearing their answers to the questions above. You can also trace the 'chain' back through peoples posts to hear different peoples thoughts about their creative process (I did this for ages last week- it was a good read!!)


.jpg)


.jpg)